|
Nintendo Wii Mod Chip Installation Instructions
|
|
|
|
|
|
|
|
|
|
|
|
Hardwire Install Diagram Downloads & Solderless Install Diagram Forum Links |
|
|
|
|
|
|
|
|
|
|
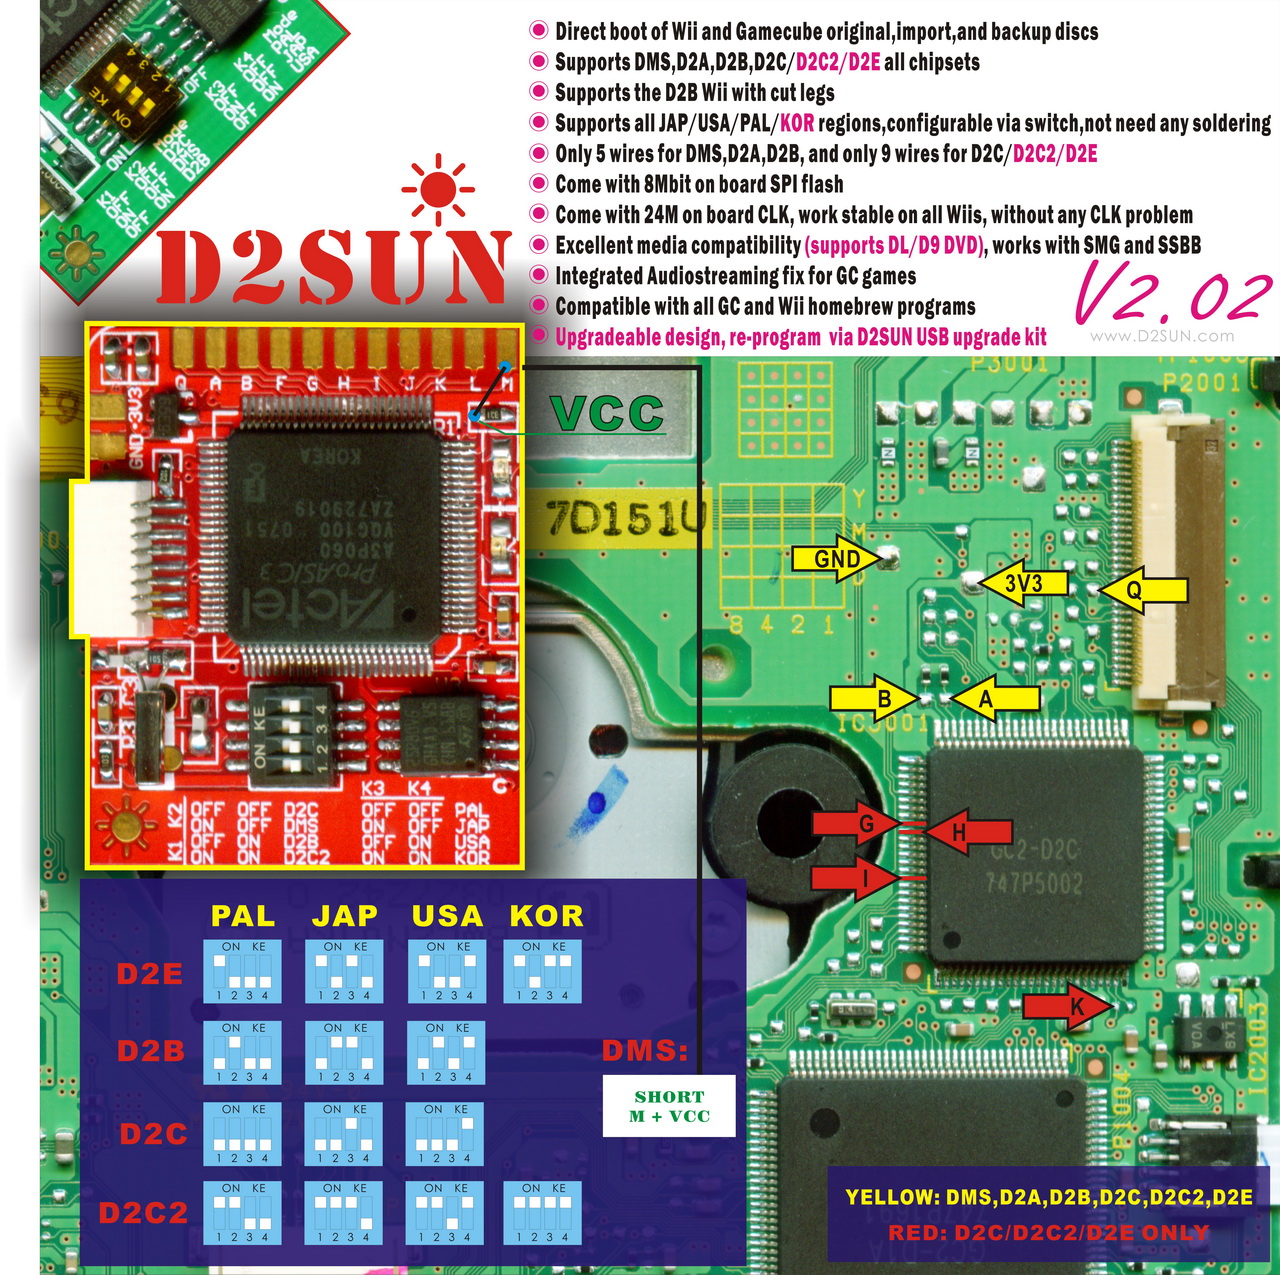
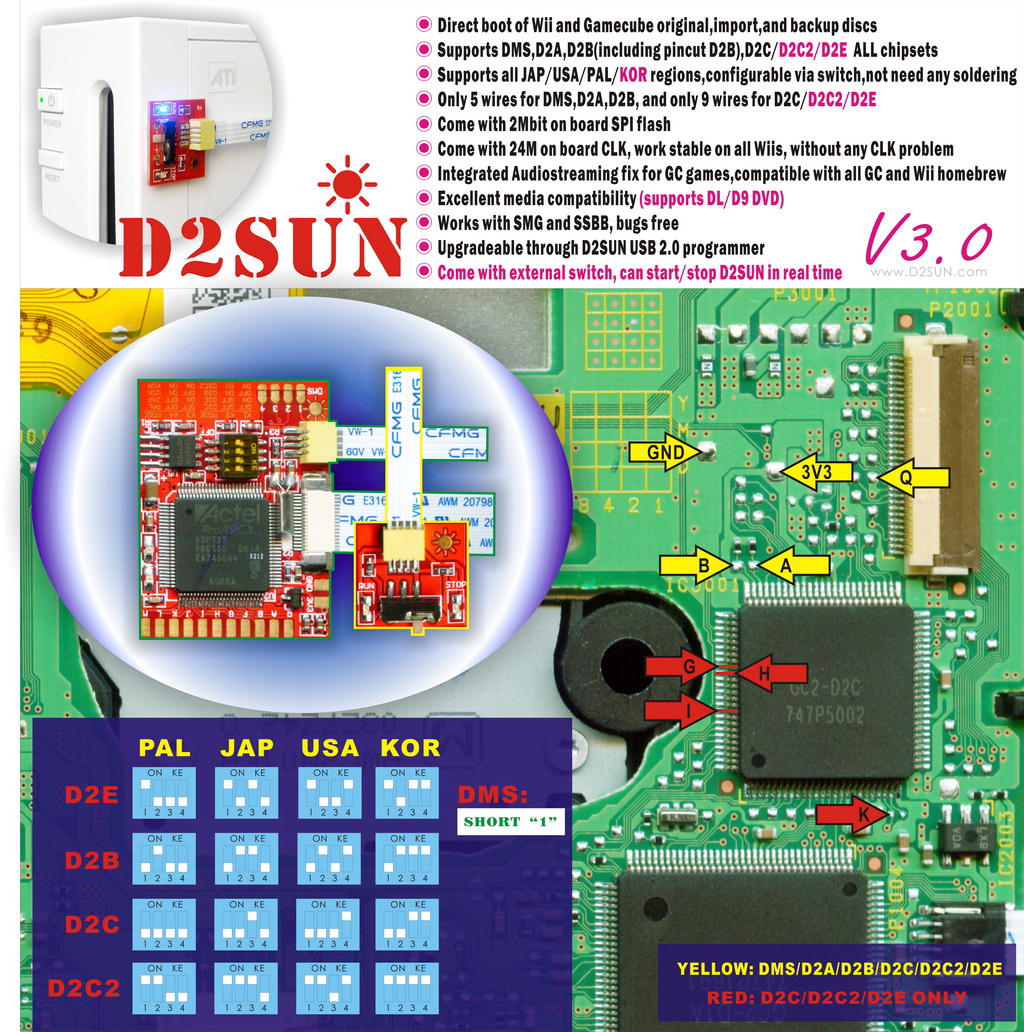
D2Sun Install Instructions
V1 & V2/V3
|
|
NOTE : For the WASP please use the same as D2pro 9 Wire
How to open your Wii Console Step by Step Instructions
To disassemble:
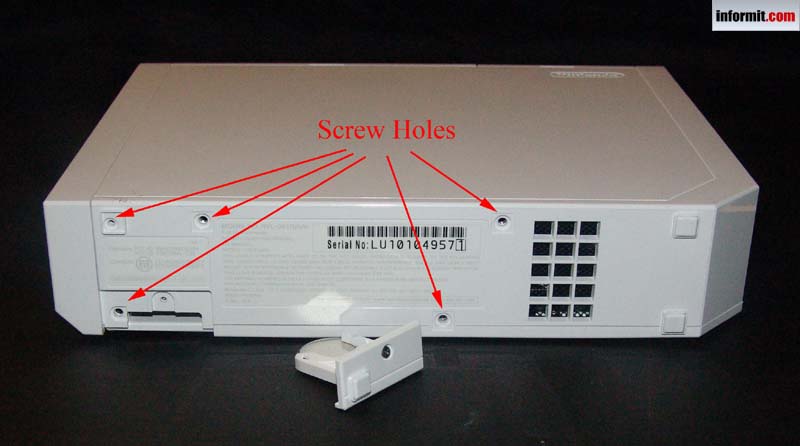
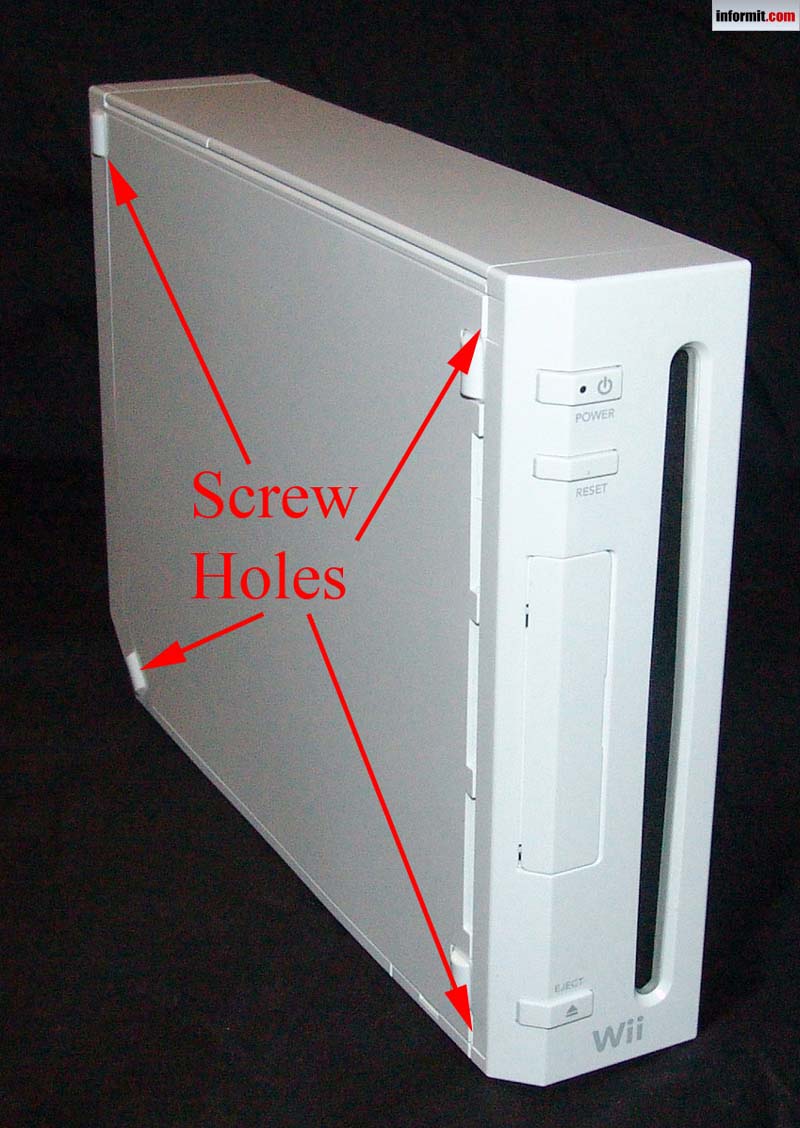
- Flip the device upside down and remove the small silver Phillips screw. Once out, remove the battery tray from the console.
- Next remove the rubber foot directly above this battery tray. Also remove the three square white stickers from the bottom of the Wii. The rubber foot and the sticker are covering hidden screws. Figure 3 provides a shot of where these screws are located.
- Unscrew the two Triwing screws and three Phillips screws from the bottom of the Wii.
-
- Flip the Wii over onto its right side. Locate and remove the two rear rubber feet and the two rectangle stickers near the faceplate.
- Remove the two silver Triwing screws in the holes and remove the two black Triwing screws on the faceplate (Figure 4).
- Flip the Wii upright and carefully remove the two socket covers. They come right out with a little wiggling.
- Remove the three black Phillips screws from the black plate (Figure 5). Note the one closest to the faceplate is the longest and will need to go back into that hole when putting the Wii back together.
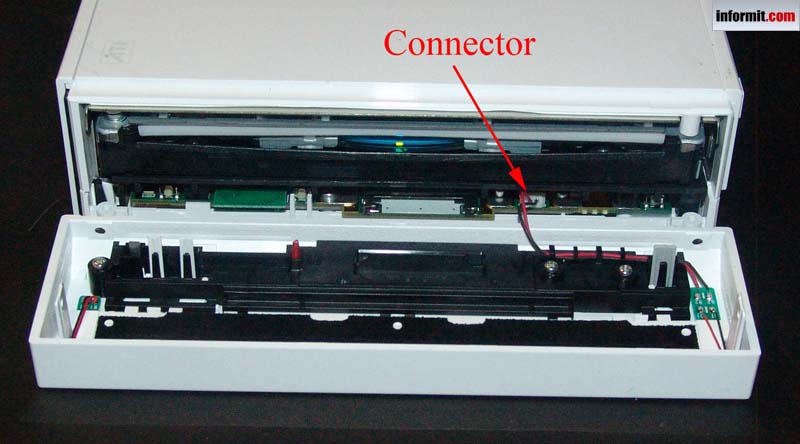
- With the screws removed, carefully pull off the faceplate of the front of the Wii. You will need to disconnect the red/black wire plug from the Wii to remove the faceplate completely. Figure 6 shows what is hiding under the faceplate.
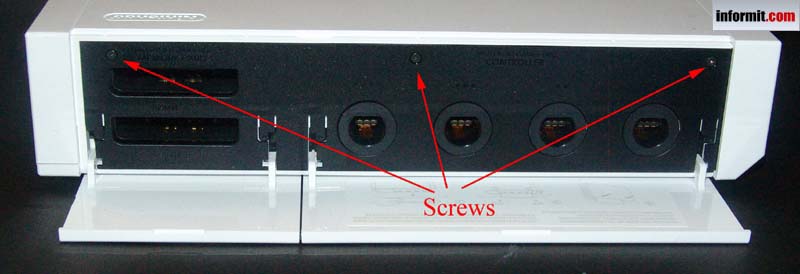
- Remove black plate from memory/controller socket area.
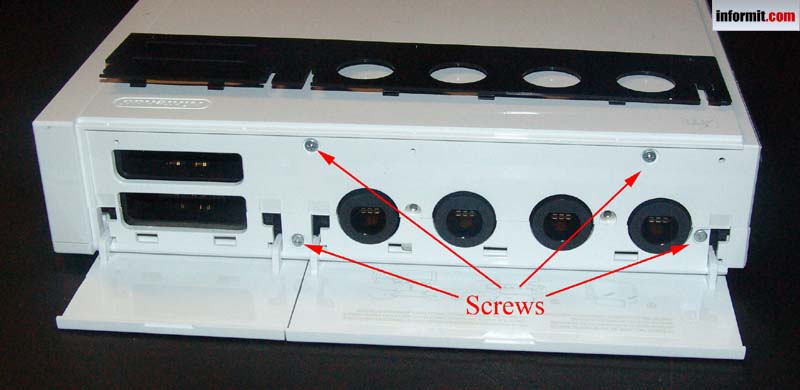
- Remove two silver Phillips and two silver Triwing screws from memory/controller socket area (Figure 7).
g
- Lay the Wii on left side (with the ATI and Nintendo logo facing you) and slowly work the right side cover of the console off the device. This will take a little bit of force. If something appears to be stuck, double check to ensure you removed all the screws.
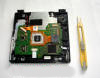
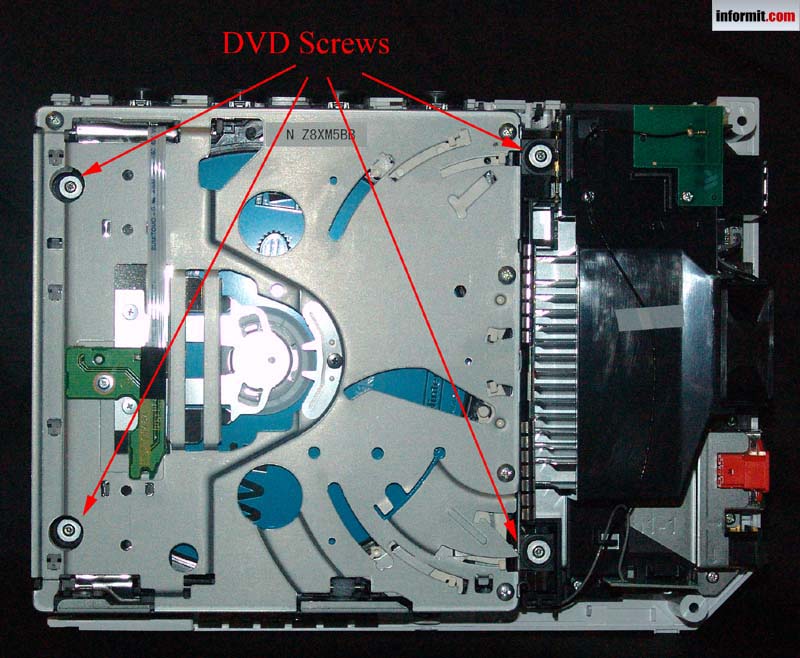
- Locate and remove four screws holding DVD reader in place. Two are located in plain site in the middle of the unit. Two are located near the front of the Wii inside the DVD unit (Figure 8).
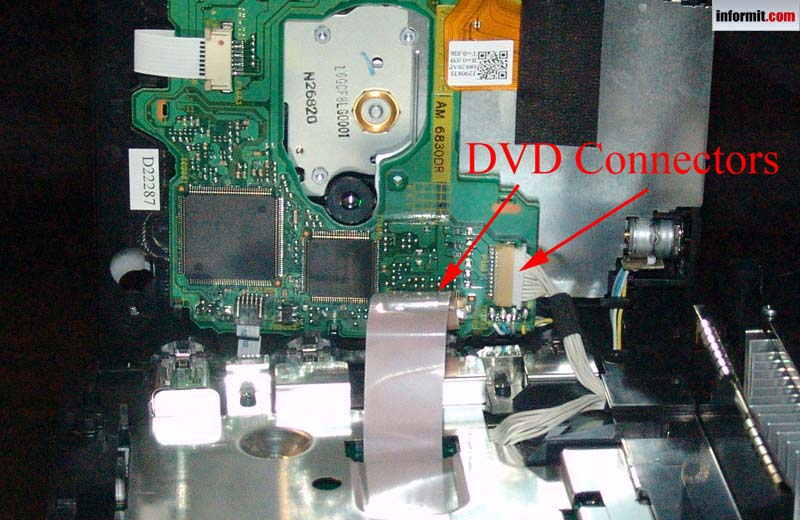
- Slowly tilt the DVD player upward toward top of Wii. There are two wires that need to be disconnected before you can safely remove the DVD unit. One is a plug type of connector that only requires a little tug. The other is a circuit strip connector that requires you to lift the brown catch, which will release the pressure holding the strip in place (Figure 9). Do not break this!
-
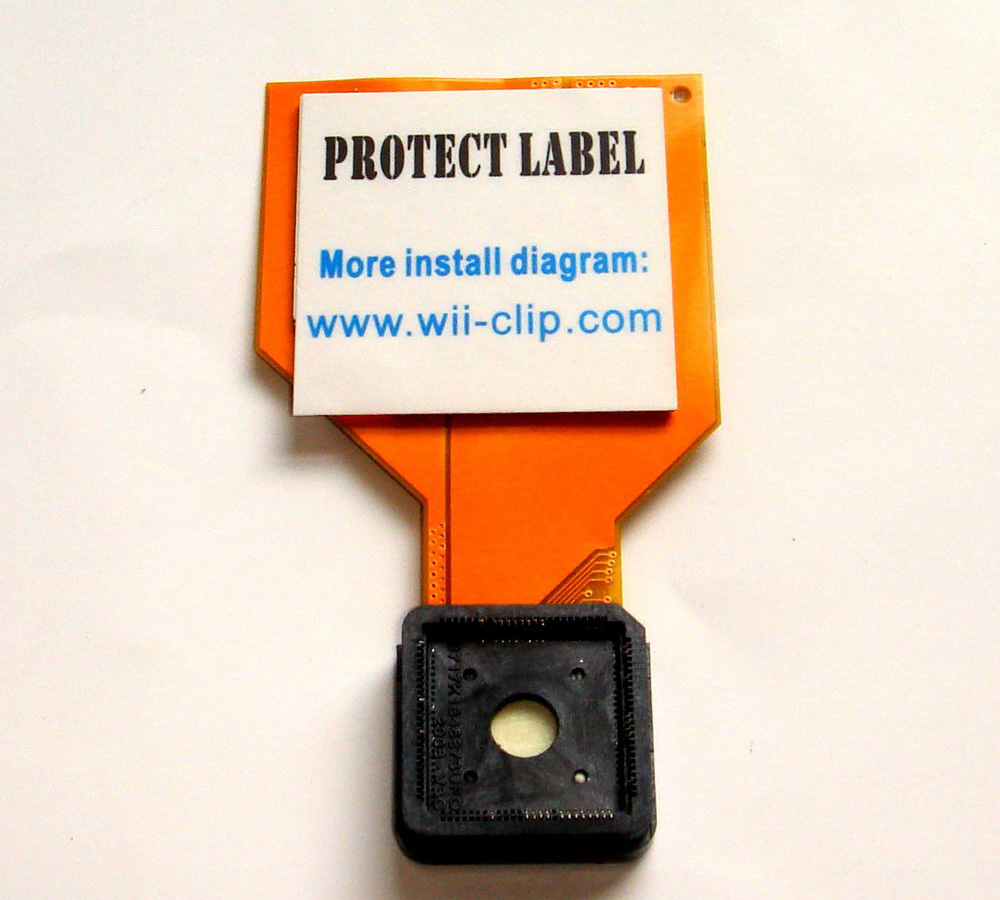
How to install the WII-CLIP, step by step instructions and troubleshooting
|
|
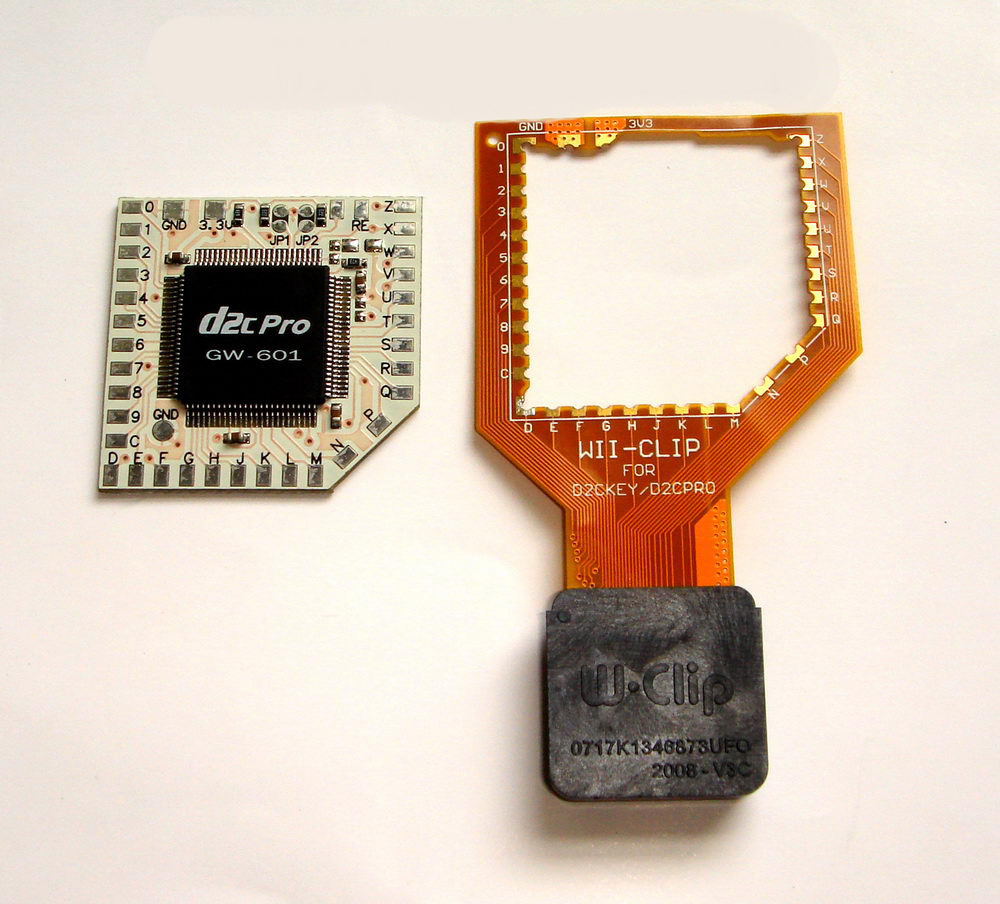
Step 1, If you have order your chip and clip pre-soldered go to step 2, otherwise line the WII-CLIP onto the corresponding MOD chip board, and solder all pins. |
|
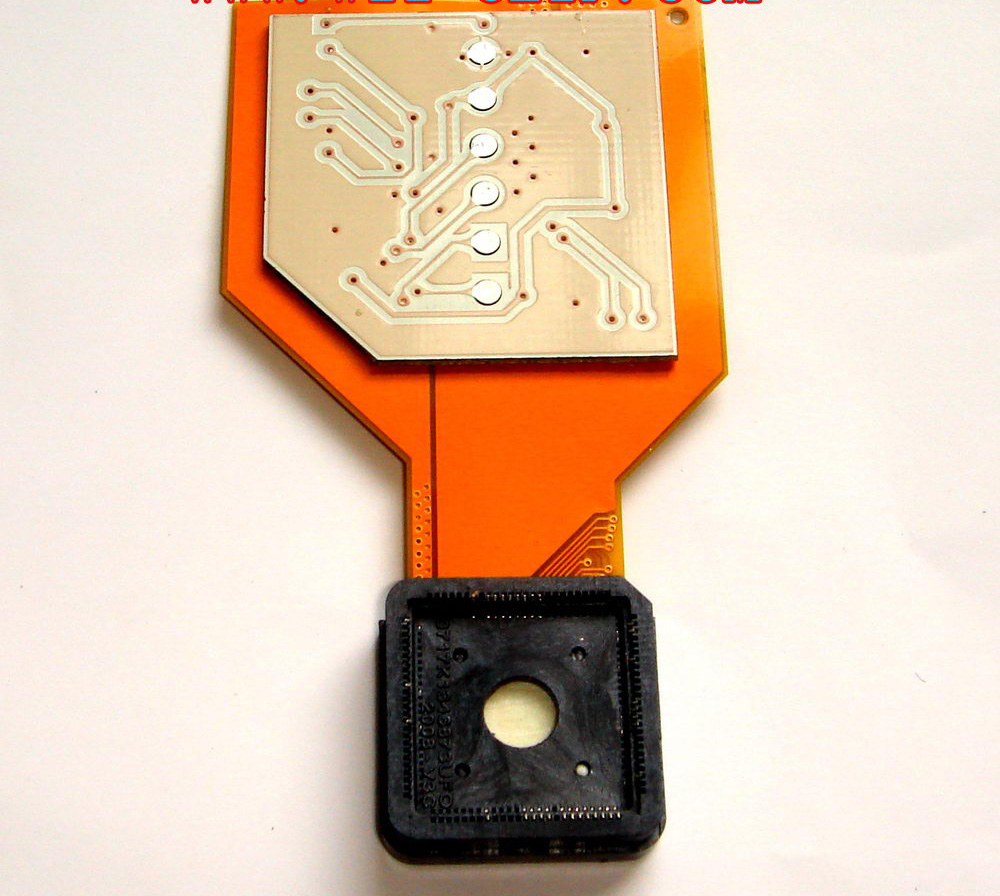
Step 2, the backside of chip board, you can see there are some test points on the PCB, now you have to protect them avoid the short circuit. Use electrical tape or a sticky pad. Make sure it's covered nice and neat as this part of the chip hovers over the CDROM vent so the less obstruction to the airflow the better - This step does not apply to the WiiKey clip |
|
Step 3, now the WII-CLIP is ready to be plugged onto the DVD drive of your Wii console. Hover the black part of the clip over the IC (it only obviously fits onto one due to the size) until you feel "fall" into place. The clip should look parallel to it's surrounding chips (don't try fitting it on a diagonal position) There will be 2 resistors with should be almost flush to the clip as you push it down which will indicate it's in the right position |
|
Step 4, push down on the clip firmly to place it, you may or may not hear a "click" when it's pushed into place, look at it from the side, the click should be almost touching the PCB board, push firmly all the way around until your happy the clip can't possibly go down anymore.
IMPORTANT : MAKE SURE YOU POSITION IT CORRECTLY AS IN STEP 3 BEFORE DOING THIS AS YOU MAY DAMAGE YOUR PINS DUE TO THE FORCE YOU HAVE TO USE TO COMPLETE STEP 4 |
|
Step 5, Cover the top of the clip, so as not to short out the the solder points when you put the DVD drive back in. Again use electrical/insulation tape and don;t plaster it all over make sure it's nice and neat so as not to cover the vent up to allow airflow.
TIP : TRY TESTING YOUR CLIP WITH THE DVD DRIVE STILL OUT BUT PLUGGED INTO THE POWER AND DATA CABLE WHILST IT'S STILL OUT OF THE CASE BEFORE ASSEMBLING IT BACK TOGETHER AGAIN |
REMOVING THE CLIP
If you want to pull out the WII-CLIP from your Wii mother board, you can pull it out by your hand directly but run the risk of damaging it if you're not careful, you should use a very sharp tool like the small knife , to prize the WII-CLIP off by the black, and remember you CAN'T prize one corner only, you MUST prize all 4 corners to make it leave the big D2C chipset smooth! Otherwise the very fragile pins of WII-CLIP will be damaged
|
That's it your finished, all very easy and simple - if you chip requires additional wires to be installed then you can install them separately or you may have to set your dip switches for d2suns, however this is all you need to do to get the basic function of the chip to work.
Troubleshooting:
If you have installed the chip and get an ERROR CANNOT READ DISK when trying any DVD game backup or original then try the following:
- Check your clip is flush with the PCB board and you have pushed down hard enough to get it to fit flush (scary process but your board can take quite a bit of pressure), it should be "hugged" by 2 resistors on 2 sides of the clip:
 |
 |
- Check the solder points on the clip: are any touching? shorting lines of other points? are not touching the clip to chip?
- Check that the back of the clip is not shorting to the board, you should have covered the points before installing the chip
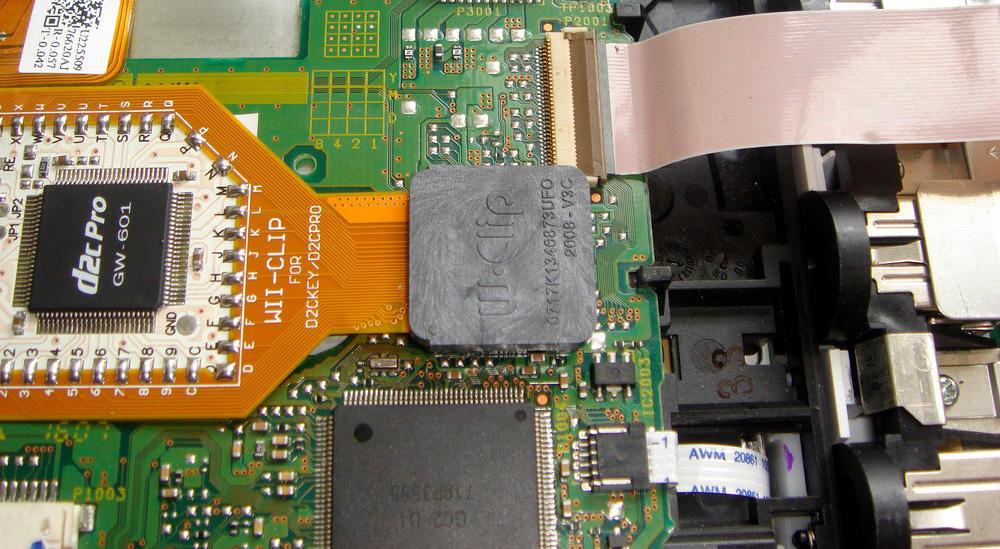
- Check you have the correct chipset, you should have done a serial search before purchasing the chip and clip, the D2C Chipset chips which you are inserting the clip onto should have GC2-D2C stamped on them in gold writing, all others will be a D2B chipset including GC2-DMS, or D2E for the newer consoles
- If you are testing for the first time using a backup make sure you have used the correct burning software and media (see left hand column) - use imgburn with verbatim DVD-r
- Whilst the Wii is switched on press and hold the power button for 5 seconds, then press again to switch the console back on, if you still get the same error then switch the wii back into it's standby mode (off), then press and hold the power button for 5 seconds to switch it on.
- Carefully remove the Clip and re-install it, it possible that some of the connections inside the clip didn't make a connection the first time
- Check you have the right chip for your console using your serial code according to the below table :
SERIAL CODE RANGES & CHIPSETS
(Look on the side of your wii console next to the barcode) |
Wii Console
Chipset type |
Console Serial
Code Range |
Consoles Purchased
From - to (est) |
Compatible Solderless
Mod Chips |
DMS, D2A & D2B |
LEH100xxx - LEH134xxx |
November 2006 - April 2007 |
|
D2C |
LEH134xxx - LEH182xxx |
April 2007 - May 2008 |
|
D2C-2 |
LEH182xxx - LEH199999 |
May 2008 - Sept 2008 |
|
D2E |
LEH200xxx - LEH224xxx |
Sept 2008 - Oct 2008 |
|
NOTE : NEW EPOXY Wii's CURRENTLY HAVE NO SOLDERLESS SOLUTIONS
We offer 3 other Solutions for epoxy resin board
|
D2E
With Epoxy Resin |
LEH224xxx and above
(estimated)
|
Nov 2008 - Present |
1) Send in your Drive for a WiiKey2 Hardwire install
2) Send in your console for a complete WiiKey2 Install
3) Hardwire a Wiikey2 in yourself |
- If you have checked all the above then there is a possibility your chip may be faulty, please make sure you have checked all the above before returning it back to us. Please return within 7 days of receiving the package and we will test your chip and send out a replacement if need be. If you have purchased a pre-soldered chip from us then you can send your DVD drive back to us with the faulty chip via recorded delivery (should cost £2.10 with insurance up to £34), we will fit and test it for you with return delivery FOR JUST £5!* If you have epoxy glue on your drive we can install for £44.95 click here for more details
- Please go to the contact page for details of where to send your item and to download and fill in the returns form to send with your package.
|
INSTALLING A WII CLIP (UNIVERSAL INSTRUCTIONS FOR ALL CHIPS)
|

WARNING: IF YOU ATTEMPT TO PUSH THE CLIP DOWN WITHOUT SEATING THE CLIP FIRST IN IT'S PROPER POSITION YOU RUN THE RISK OF DAMAGING YOUR PINS! PLEASE READ THESE SECTIONS FIRST BEFORE ATTEMPTING TO INSTALL ANY WII-CLIP!
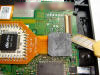
Locate the IC chip on the underside of you DVD drive, to confirm you have a D2C chipset this particular IC should have GC2-D2C or GC2-D2E or GC2-D2B or GC2-DMS stamped on to it in gold lettering (D2C2 drives do not have D2C2 Stamped on them, they still say D2C). Make sure there is nothing obstructing the pins for the clip around the IC. |
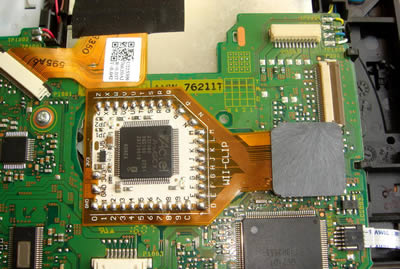
The clip and chip should cover the centre of the DVD drive,
DO NOT INSTALL IT ANY OTHER WAY THAN AS SHOWN TO THE LEFT
The underside and overside of the chip should be sealed so that none of the points can touch any other piece of metal and short the chip out, use the cardboard tags provided or some electrical tape to cover all the solder points
Also do not tape the chips down, it should hover over the vent not seal it to allow air to flow through |

The clip should sit flush as possible to the PCB (should be touching or a 0.25mm gap), you will have to apply quite a lot of pressure to get it to do this
IMPORTANT NOTE : make sure you align it up with the IC properly first before pushing it down, we recommend you push down on one side of the clip first, then whilst still holding it down push the opposite side simultaneously, Then go round the perimeter of the clip and push all sides down a few times until your confident it can't go down anymore, you will have to apply a lot of pressure that the PCB board underneath with bend ever so slightly, this is normal but make sure you are on a flat surface and the clip is seated right before pushing down. If it's catching any resistor then it's not seated right, remove it, check your pins and try again!
Never try reapplying the clip if you have bent any of your pins on the underside of you clip!
When you put your drive back together make sure you tuck away your cable's neatley otherwise they will catch and rock the DVDROM drive when you put it back in |
Wire for the D2CPro Chip Disable Function
 |
The RE point on the D2CPro chip is to enable the "stealth" mode disable function which will allow you to go online with wiiconnect24 and update your console firmware without the chip being detected (preventing the risk of bricking)
The wire to install this option is terminated one end at the centre pin of the SW2 switch located directly behind the reset button of your console, to access it you will have to remove the 3 screws from the black cover at the front of your Wii with the DVD drive removed
Careful not to solder the 3 points together! these point are tiny, our technique is to dip the end of the wire into some hot solder then let it cool and clean your iron, then touch the wire to the centre pin and fuse together with the iron, a small piece of solder should come off the wire and fuse it with the centre pin, attached the other end to the RE point of the D2CPro and your finished! |
|


